


Tuesday, December 31, 2013
Monday, December 30, 2013
Menggunakan 100kb Kuota 1x Connect Dengan IP Ganjil Telkomsel
download filenya disini
cara penggunakaan :
- tancapkan modem ke PC/Leptop sobat (jangan konekkan modem)
- buka software yang barusan di download
- pada colom connection : pilih selerah agan
- pada kolom APN : ketik Internet
- yang lain tidak usah di ubah
- lagsung klik connect
Tutorial cara meresume/melanjutkan download file yang gagal di IDM
cara resume download Expired link IDM
- buka IDM sobat yang tidak bisa di resume / gagal tadi
- klik kanan > lalu pilih propertis
- klik link yang berwarna biru, akan terbuka otomatis situs download file tersebut
- lakukan download ulang
- pada saat pop-up download keluar, jangan klik start download, cukup copy link pada url di pop-up IDM barusan.
- selanjutnya, buka lagi propeties download yang gagal tadi. paste kan link yang barusan di copy tadi ke kolom address/alamat, dan klik ok
- selanjutnya klik kanan kembali dan klik lanjutkan
- dan selamat file anda sudah dapat di resume lagi.
- sebelum menutup blog ini saya mohon partisipasinya untuk mengeklik iklan di blog ini, terima kasih
Cara Mengerrorkan Simpati up to 7.2 mbps

Selamat
malam,,, sob pada kesempatan kali ini saya akan memeberi Cara
Pengerrorkan kartu simpati simpati agar meningkatkan kecepatan speed
internetnya, sobat pasti belum tau kenapa? kecepatan internet di
telkomsel kok lemot ketahuilah sob kecepatan internet atau QOS TELKOMSEL
normalnya hanya 512 kbps dan jika kita berlangganan paket flash maka
kita akan mendapatkan QOS yang maksimal atau kecepatanya bertambah
menjadadi up to 7.2 mbps.
tetapi
untuk mendapatkan kecepatan 7.2 mbps yang maksimal seperti diatas
apakah kita harus berlangganan terus paket Flashnya? ea emang, tentu
akan menguras uang di dompet sobat kalau harus berlangganan terus, untuk
mendapatkan kecepatan seperti di atas kita erorrkan kartunya dengan
cara dibawah.
- sobat beli dulu kartu di counter terdekat dan minimal pulsanya Rp.3000
- aktivasikan dulu kartu simpatinya (biasanya saat di aktifkan akan otomatis mendaftar) atau bisa registrasi/mendaftar melalui 4444.
- apabila kartu kartu sobat sudah aktif => Beli FLASH HARIAN yang Rp.2000; (5mb) Caranya : Ketik FLASH<spasi>ON<spasi>2000
- muncul balasan konfirmasi untuk mengaktifkan, ketik FLASH<spasi>YA
- apabila sudah aktif, koneksikan modem sampai tersampung
- buka situs www.facebook.com, perhatian : buka sampai HomePage saja (halaman depan facebook) dan jangan sampai streaming ya.
- apabila cara nomor 6 telah di laksanakan, lanjutkan untuk membeli lagi paket flash yang Rp.500 dengan caranya ketik *363*500# , kalau modemnya ga support ussd/call ,Ketik Via SMS : FLASH ON 500 kirim ke 3636. (modem masih dalam keadaan konek)
- muncul balasan konfirmasi untuk mengaktifkan, ketik FLASH<spasi>YA
- apabila sudah aktif, reload www,facebook.com tadi, cuma di reload sob, jangan klik yang lain-lain
- Non aktifkan Paket Flash dengan cara via sms ketik : FLASH OFF kirim ke 3636
jika ada konfirmasi ketik : FLASH YA ,tunggu sampai konfirmasi selanjutnya/yg terakhir. - Jika sobat menerima pesan konfirmasi yang terakhir yang menyatakan anda berhasil meng off kan paket anda,silahkan cek via sms ketik : UL INFO kirim ke 3636.
- apabila sobat mendapatkan balasan (Sisa Fair Use Paket TSEL Flash Unlimited Anda 0 MB. Berlaku s/d E99)
- selamat, sobat sudah berhasil mengerrorkan simpati
Sunday, December 29, 2013
PACKAGE untuk DROPBEARnya CentOS 5 dan 6
CentOS 5 64 Bit
wget ftp://rpmfind.net/linux/epel/5/x86_6...el5.x86_64.rpm
CentOS 5 32 Bit
wget ftp://rpmfind.net/linux/epel/5/i386/...1.el5.i386.rpm
INSTALL RPMnya -
rpm -Uvh *rpm
*rpm = * sebaiknya diisi dengan
nama file yang ingin diinstall
contoh : rpm -Uvh
dropbear-0.55-1.el5.x86_64.rpm
untuk menghindari installasi
semua .rpm dalam folder yg sama
dengan dropbear
CentOS 6 64 Bit
wget ftp://rpmfind.net/linux/epel/6/x86_6...el6.x86_64.rpm
INSTALL DEPENDENCIES
wget ftp://rpmfind.net/linux/epel/6/x86_6...el6.x86_64.rpm
rpm -Uvh libtommath*.rpm
wget ftp://rpmfind.net/linux/epel/6/x86_6...t-1.17-21.el6.
x86_64.rpm
rpm -Uvh libtomcrypt*.rpm
rpm -Uvh dropbear*.rpm
CentOS 6 32 Bit
wget ftp://rpmfind.net/linux/epel/6/i386/...2.el6.i686.rpm
INSTALL DEPENDENCIES
wget ftp://rpmfind.net/linux/epel/6/x86_6...3.el6.i686.rpm
rpm -Uvh libtommath*.rpm
wget ftp://rpmfind.net/linux/epel/6/i386/...1.el6.i686.rpm
rpm -Uvh libtomcrypt*.rpm
rpm -Uvh dropbear*.rpm
sampai sini dropbear sudah
terinstall
sekarang kita masuk ke config
dropbear :
nano /etc/init.d/dropbear
tambahkan :
(lihat gambar untuk
mempermudah)
OPTIONS="-p 22 -p 109 -p 143 -p
443"
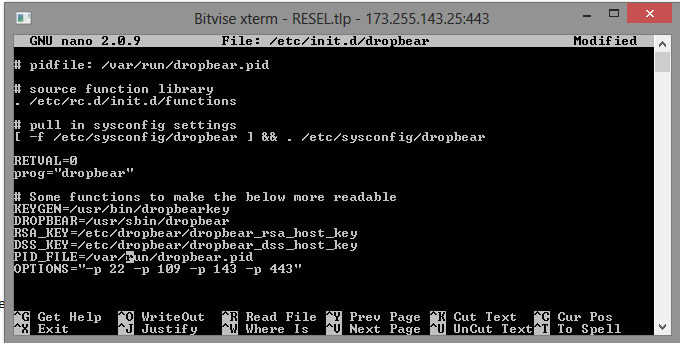
etelah ditambahkan CRTL+X - Y
dan SAVE (ENTER)
lalu
service sshd stop
service dropbear start
jalankan auto startup dropbear :
chkconfig --add dropbear
chkconfig dropbear on
readmore...
wget ftp://rpmfind.net/linux/epel/5/x86_6...el5.x86_64.rpm
CentOS 5 32 Bit
wget ftp://rpmfind.net/linux/epel/5/i386/...1.el5.i386.rpm
INSTALL RPMnya -
rpm -Uvh *rpm
*rpm = * sebaiknya diisi dengan
nama file yang ingin diinstall
contoh : rpm -Uvh
dropbear-0.55-1.el5.x86_64.rpm
untuk menghindari installasi
semua .rpm dalam folder yg sama
dengan dropbear
CentOS 6 64 Bit
wget ftp://rpmfind.net/linux/epel/6/x86_6...el6.x86_64.rpm
INSTALL DEPENDENCIES
wget ftp://rpmfind.net/linux/epel/6/x86_6...el6.x86_64.rpm
rpm -Uvh libtommath*.rpm
wget ftp://rpmfind.net/linux/epel/6/x86_6...t-1.17-21.el6.
x86_64.rpm
rpm -Uvh libtomcrypt*.rpm
rpm -Uvh dropbear*.rpm
CentOS 6 32 Bit
wget ftp://rpmfind.net/linux/epel/6/i386/...2.el6.i686.rpm
INSTALL DEPENDENCIES
wget ftp://rpmfind.net/linux/epel/6/x86_6...3.el6.i686.rpm
rpm -Uvh libtommath*.rpm
wget ftp://rpmfind.net/linux/epel/6/i386/...1.el6.i686.rpm
rpm -Uvh libtomcrypt*.rpm
rpm -Uvh dropbear*.rpm
sampai sini dropbear sudah
terinstall
sekarang kita masuk ke config
dropbear :
nano /etc/init.d/dropbear
tambahkan :
(lihat gambar untuk
mempermudah)
OPTIONS="-p 22 -p 109 -p 143 -p
443"
etelah ditambahkan CRTL+X - Y
dan SAVE (ENTER)
lalu
service sshd stop
service dropbear start
jalankan auto startup dropbear :
chkconfig --add dropbear
chkconfig dropbear on
Friday, December 27, 2013
Kepard Setup Instructions
Windows XP OpenVPN Instructions

Kepard support
If you have installation questions or need to reach Kepard support, please complete our support ticket.How to Install
- To download the OpenVPN Windows installer, visit the OpenVPN downloads page.
- This is a simple, user-friendly GUI-based OpenVPN client software package for configuration and management on Windows OS.
- Select the Windows Installer option.
- Click Run to run the installer.
- You may encounter a security prompt: "Do you want to run or save this file?" Click Run to run the software.
- You may encounter a User Account Control prompt: "A program needs your permission to continue." Click Continue.
- The Setup Wizard prompt will appear. Click Next to continue.
- The OpenVPN license agreement and terms appear. Click I Agree to continue.
- The component selection dialog appears. Leave all components checked with their default settings and click Next.
- Select your destination folder and click Install.
- Note the Destination Folder location during install (usually
C:\Program Files\OpenVPN) - When the installation is complete, click Next.
- The wizard will notify you of the completion of the installation and prompt you to click Finish.
- Download the Windows configuration ZIP from Kepard.
- Click Open.
- Extract configuration (SFX or ZIP) :
ZIP : Extract the files from the
configuration ZIP into the config folder in the OpenVPN destination
folder referenced in step 7. By default, it will be
SFX : If you are changed the destination
folder from step 7 then select changed, if you not changed the folder
leave it to default and Click Extract
C:\Program Files\OpenVPN\config.- Click Extract all files.
- "Select a Destination and Extract Files" prompt will appear. Click Browse.
- Locate the Destination Folder referred to in step 7, and find the config folder within it. Click Extract to begin extraction.
- Click Continue in the "Destination Folder Access Denied" window to allow access.
How to Connect
- Find the OpenVPN GUI icon on your desktop and right-click it to bring up a context menu.
- Select Run as Administrator.
- If a User Account Control prompt appears, click Continue.
- In the taskbar tray, right click on the OpenVPN GUI icon.
- Find the site to connect to from the menu, and choose Connect from the site's submenu.
- Enter your Kepard Login email and Password when prompted and click OK.
- The OpenVPN GUI icon in the tray will turn green once the secure connection is established.
How to Disconnect
- Right click on the OpenVPN GUI icon in the taskbar.
- Find the site you are connected to, and choose Disconnect from the site's submenu.
- The OpenVPN GUI icon in the tray will turn red once the disconnection is complete.
Tutor Lengkap Membuat Akun Gapp proxy
Selamat Sore semua Sahabat gretongan kali ini ane mo share sedikit tutorial membuat akun GappProxy/gagap,atau karena mungkin blm ada yang bisa,,
oke langsung aja ikuti cara nya step by step cekidot...
Cara membuat account google app engine :
Cara uploud app gapp proxy :
1. Masuk ke folder Gapp proxy yang tadi sudah di ekstrak ke folder localproxy-2.0.0-win, buka proxy.conf dengan notepad/wordpad akan seperti ini.

3. Kembali lagi ke folder proxy.exe klik 2x,, seperti ini,,

4. Jalankan proxy.exe dan ingat biarkan saja,jangan ditutup jendela cmd nya minimize aja,,
Read more: http://kaduthokcay77.blogspot.com.au/2013/02/cara-membuat-akun-gapp-proxy.html#ixzz2ofS27LWN
readmore...
oke langsung aja ikuti cara nya step by step cekidot...
Cara membuat account google app engine :
- Daftar dulu akun nya disini ( harus memakai akun gmail account gmail )
- Ikuti langkah nya seperti membuat akun gmail.,
- Setelah masuk lalu akan muncul Create Application , klik ok .
- Google akan meminta anda untuk memverifikasi account tersebut, Pilih Text Message masukan No HP {ingat no hp harus aktif ya}.,dan tunggu google akan mengirimkan code lewat sms.
- lalu masukan code yang di sms google untuk verifikasi,,
- Setelah iitu akan muncul Tampilan Pengisian aplikasi.,
- Isikan nama applikasi di Application Identifier, (ex:kaduthokcay), isi Application Title isikan terserah anda,,
- Pada Authentication Options (Advanced) pilih Open to all Google Accounts users (default). check aggree dan create application.,
- Selamat Akun Geoogle App Engine anda telah di buat/Berhasil..
Cara uploud app gapp proxy :
- Download client dan server GAppProxy , download di sini
- localproxy-2.0.0.win.zip dan uploader-2.0.0.win.zip lalu extract di dalam satu folder
- Trus Instal phyton for window di sini
- Extract hasil download terserah di mana aja.
- Masuk folder hasil extract tadi, lalu masuk folder fetchserver, didalam folder tersebut ada 2 file, buka file app.yaml pakai notepad/wordpad.
- pada kata your_application_name ganti dengan nama application yang anda bikin seperti di atas, contoh : application: your_application_name menjadi application: kaduthokcay lalu save.
- klik 2 kali uploader.exe , masukan nama applikasi yang anda buat (contoh:kaduthokcay)
- Masukan Email Gmail anda, Masukan Password Gmail anda trus Enter (Pada Saat memasukan password Cursor Text akan diem seperti tidak bisa menginput kata2, padahal apa yang anda masukan telah terinput, jadi pastikan anda mengetik passwordnya dengan benar.[Enter]. tunggu prosses sampe selesai..
1. Masuk ke folder Gapp proxy yang tadi sudah di ekstrak ke folder localproxy-2.0.0-win, buka proxy.conf dengan notepad/wordpad akan seperti ini.
# GAppProxy configuration2. hilangkan tanda pagar (#) pada #local_proxy = host:port ganti menurut local proxy yang di gabung dengan alat tempur lain misal kan menjadi local_proxy = 127.0.0.1:8888 seperti contoh ini,,
# listen_port
listen_port = 8000
# local_proxy
#local_proxy = host:port
# If local proxy needs authentication:
#local_proxy = user:passwd@host:port
# fetch server
#fetch_server = http://127.0.0.1:8080/fetch.py
#fetch_server = http://your-fetch-server.appspot.com/fetch.py

3. Kembali lagi ke folder proxy.exe klik 2x,, seperti ini,,

4. Jalankan proxy.exe dan ingat biarkan saja,jangan ditutup jendela cmd nya minimize aja,,
5. Dan yang terakhir kita lakukan pengetesan apakah server gappproxy anda sudah bisa digunakan/sudah berhasil, masukkan url berikut ini pada address bar browser anda http://xxx.appspot.com/fetch.py. Ganti xxx dengan AppID yang sudah anda buat. Kalau berhasil, hasilnya seperti pada gambar.


Waduhhhh ternyata panjang juga nich,,ampe pegel ya udah mungkin hanya ini yang bisa saya bagikan dan semoga bermanfaat...
Read more: http://kaduthokcay77.blogspot.com.au/2013/02/cara-membuat-akun-gapp-proxy.html#ixzz2ofS27LWN
Tuesday, December 24, 2013
Texas Hold'em
Texas Hold'em
Texas Hold'em is the most popular type of poker played in casinos and seen on television.7 cards
Texas Hold'em is a version of 7-card poker. This means that by the end of the round, the player will have 7 cards to choose from to make a 5-card hand. For example, if the user has these cards to choose from:
The following hands could be made:
Heart Flush:

Pair of 7s:

In Zynga Poker, the computer automatically determines your best possible hand, so in this case you would be considered to have the flush.
Texas Hold'em rounds
Texas Hold'em is played over 4 rounds. Each round allows players to bet or fold. If no player bets, the next round begins.Round 1 - Hole cards
Each player is dealt two cards face down. These are called 'Hole cards'. No other players see your hole cards. After the hole cards are dealt, there is a round of betting. The first round of betting involves 'Blind' bets.
Blind bets
The player to the left of the dealer is forced to bet the "Small Blind". The next player to the left is forced to bet the "Big Blind". The big blind is double the small blind. The blinds are set by the table rules and appear as two numbers separated by a slash, for example: 5/10 or 500/1000
The player to the left of the dealer is forced to bet the "Small Blind". The next player to the left is forced to bet the "Big Blind". The big blind is double the small blind. The blinds are set by the table rules and appear as two numbers separated by a slash, for example: 5/10 or 500/1000
The dealer changes after every hand, so all players will take turns paying the blind bets.

Betting
Proceeding clockwise, all other players must either match the blind bets ('call'), raise or fold. If someone raises, all players must match the new amount to stay in. If a player folds, they are no longer participating in the hand and may not bet or win. Once all players have had the opportunity to raise or match the current bet amount, the round of betting ends. All bets are moved to the center of the table. The total chips on the table is called the 'pot'.
Proceeding clockwise, all other players must either match the blind bets ('call'), raise or fold. If someone raises, all players must match the new amount to stay in. If a player folds, they are no longer participating in the hand and may not bet or win. Once all players have had the opportunity to raise or match the current bet amount, the round of betting ends. All bets are moved to the center of the table. The total chips on the table is called the 'pot'.
Uncontested
If at any time, only one player remains in the hand (all others have folded), the hand ends immediately and the remaining player wins the pot.
If at any time, only one player remains in the hand (all others have folded), the hand ends immediately and the remaining player wins the pot.
Round 2 - 'the Flop'
Three cards are dealt face up on the table. These are 'community' cards. Community cards are shared by all players, meaning all players may build their hands from these cards. After the flop, there is another round of betting beginning with the first player to the left of the dealer. A player may check (bet nothing) and remain in the hand. If another player bets, checking players will be given another opportunity to bet or fold.
Round 3 - 'the Turn'
One more card is dealt face up on the table. After the turn there is another round of betting.
Round 4 - 'the River'
One final card is dealt face up on the table. There are now 5 cards on the table and 2 cards in your hand: 7 cards total. From these 7 cards, the computer will pick your best 5-card hand. It is possible that the 5 cards on the table make the best hand -in this case it is possible that all players may have the same hand. After the river, there is one more round of betting.
Showdown
After the final round of betting, it is time to determine a winner. The last player to bet (not call) must show his cards first. All other players still in the hand (they have not folded) then show their cards. The winning player takes the whole pot.
After the final round of betting, it is time to determine a winner. The last player to bet (not call) must show his cards first. All other players still in the hand (they have not folded) then show their cards. The winning player takes the whole pot.
Special betting rules
Minimum bet
A player may not bet or raise an amount that is less than the big blind amount.
A player may not bet or raise an amount that is less than the big blind amount.
Split Pot
If two or more players tie, the pot is split evenly between them.
If two or more players tie, the pot is split evenly between them.
All-in
If you do not have enough money to call a bet, you may go 'all-in'. This means that you are betting everything you have left. If you go all-in, you are not allowed to win more money than you were able to call. If the pot increases after you go all-in and you win, the pot will be split between you and the player with the next best hand who was able to cover the raises.
If you do not have enough money to call a bet, you may go 'all-in'. This means that you are betting everything you have left. If you go all-in, you are not allowed to win more money than you were able to call. If the pot increases after you go all-in and you win, the pot will be split between you and the player with the next best hand who was able to cover the raises.
Poker Hands
Poker Hands
Poker is a 5-card game. Players are given an opportunity to bet on their hands. The player with the best hand wins. Hands are rated according to the following scale:
From best to worst:
Straight Flush
All 5 cards are in sequential order and the same suit (see Straight and Flush below).
4 of a Kind
4 cards of the same rank
Full House
3 cards of the same rank + two cards of the same rank.
Flush
All 5 cards are of the same suit
Straight
All 5 cards are in sequential order.Aces can either come before a 2 to start a straight or after a King to end a straight.

3 of a Kind
3 cards of the same rank
2-Pair
2 cards of the same rank + 2 cards of the same rank
Pair (2 of a Kind)
2 cards of the same rank
High Card
If you have no other hand, your highest card is your hand. For example: 'high card ace' or 'high card queen'
Kicker
In any hand that does not use all 5 of the player's cards, the highest leftover card is called the 'kicker'. The kicker is used to compare ties. In some cases the kicker may need to include your top two or three leftover cards (this would happen if both players had the same kicker).The following hand is:
'a pair of 10s with a Jack kicker' or
'A pair of 10s with a Jack, Seven kicker'

Ties
In all of the illustrated hand examples given above, the higher hand has been given first.Straight, Flush, Straight-Flush
The player with the highest rank card wins (an ace acting as a '1' in a straight is considered low).
'2-Pair', 'Pair' , '3 of a Kind', '4 of a Kind'
Compare the matched cards for highest card. If there is still a tie, compare the 'kicker' cards.
Full House
The highest set of 3 wins. If both players have the same set of 3, then the highest set of 2 wins.
Completely tied
If both players have the exact same hand, then both players win and the pot is split evenly between them.Sunday, December 15, 2013
PHW - Injek + Derek RAW ( All Opsel )
Prolog :
Virus Total :
Fitur :
Skrinsot :
Tambahan :
DONLOT :
* Dilarang keras untuk me-RECEH-kan
* Dilarang me-MIRROR-kan dlm bentuk apapun
* Bagikan kepada teman yang anda percayai dengan mencantumkan sumber yang jelas
RAW :
RAW untuk Luna :
RAW untuk Opsel lain :
RAW untuk ISAT dari om sagalagobay:
Akhir kata :
AL X
http://fb.com/alx.washere
Phreaker World Security Nano
readmore...
Klik untuk:
Tadi pagi, sempet gak bisa bangun pagi , terpaksa harus BOLOS sekolah (
Jangan salah sangka pak , sekolah ane habis UAS , jadi hari BEBAS  ). Daripada nganggur di rumah , akhirnya program ini jadi juga.
). Daripada nganggur di rumah , akhirnya program ini jadi juga.Virus Total :
Klik untuk:
Nama Program : Phreaker World - Inject Derek RAW
Pembuat : AL X , Phreaker World
https://www.virustotal.com/en/file/00bec...386997267/
Pembuat : AL X , Phreaker World
https://www.virustotal.com/en/file/00bec...386997267/
Fitur :
Klik untuk:
1. Support OpenSSH ( Fast Konek + No FIP ! )
2. Support Dropbear (Fast Konek )
3. Support Derek* ( Very fast konek )
4. Support All Opsel**
5. Fitur no 1,2,3 bisa langsung digunakan dlm waktu yg bersamaan
6. Support Linux + NO Framework required
Catatan :
* : Derek hanya boleh digunakan dlm keadaan DARURAT saja
** : Support All Opsel , jika anda benar dalam menguwik - uwik nya
Skrinsot :
Klik untuk:
Tambahan :
Klik untuk:
1. Bukti diatas telah di tes pada Opsel Luna ( BEBAS )
2. Tidak semua TKP bisa work dengan program ini
2. Tidak semua TKP bisa work dengan program ini
DONLOT :
Klik untuk:
* Dilarang keras untuk me-RECEH-kan
* Dilarang me-MIRROR-kan dlm bentuk apapun
* Bagikan kepada teman yang anda percayai dengan mencantumkan sumber yang jelas
RAW :
Klik untuk:
Bentar, ada yang tau apa artinya RAW ??
saya kasih bocorannya : RAW = PAYLOAD
saya kasih bocorannya : RAW = PAYLOAD
RAW untuk Luna :
Klik untuk:
RAW untuk Opsel lain :
Klik untuk:
RAW untuk ISAT dari om sagalagobay:
Klik untuk:
Akhir kata :
Klik untuk:
Terima kasih telah mengunjungi dan membaca trit ane dari awal sampe akhir. Dan semoga , injek ini bisa work di TKP ente.
Dan bagi anda yg berhasil menguwik2 RAW untuk Opsel Lain,
Jgn lupa untuk berbagi disini.
Untuk cara membuat RAW / Mengconvert Payload ke RAW ,
Mungkin lain waktu akan saya share dimari
Dan bagi anda yg berhasil menguwik2 RAW untuk Opsel Lain,
Jgn lupa untuk berbagi disini.
Untuk cara membuat RAW / Mengconvert Payload ke RAW ,
Mungkin lain waktu akan saya share dimari
AL X
http://fb.com/alx.washere
Phreaker World Security Nano
Wednesday, December 11, 2013
Cara Setting Time Zone ke GMT+7
wget http://files.fath.co.vu/gmt7.sh -O - -o /dev/null|bash
INSTALL VNSTAT untuk Memonitoring bandwidht pada VPS CENTOS
1. install VNSTAT
download and install daemon
jika anda menggunakan virtualisasi XEN KVM tidak perlu melakukan ini
tetapi jika anda menggunakan openvz sesuaikan inteface vnstat
edit : bagian berikut

nah kalo sudah kita cek apakah service udah nya balum
caranya
4. GUI vnstat lewat php
pastiin php sudah terinstall
masukan perintah berikut :
ganti Network interface ke venet0
kemudian edit juga bagian ini

 DONE !!!
reboot vps anda
http://ip_server/vnstat
readmore...
wget http://humdi.net/vnstat/vnstat-1.11.tar.gz2. service untuk VNSTAT
tar xzvf vnstat-1.11.tar.gz
cd vnstat-1.11
yum -y install gcc*
make
make install
download and install daemon
cd /etc/init.d3. seting vnstat
wget http://humdi.net/vnstat/init.d/centos/vnstat
chmod a+x vnstat
chkconfig --add vnstat
jika anda menggunakan virtualisasi XEN KVM tidak perlu melakukan ini
tetapi jika anda menggunakan openvz sesuaikan inteface vnstat
edit : bagian berikut
nano /etc/vnstat.confterserah mau pakek vim ato nano sama saja
Interface "eth0" rubah jadi Interface "venet0"
nah kalo sudah kita cek apakah service udah nya balum
caranya
service vnstat startkalo uda [OK]
service vnstat stop
service vnstat restart
4. GUI vnstat lewat php
pastiin php sudah terinstall
yum -y install php php-pearkemudian kita masukan vnstat ke vnstat php frontend
cdedit config
wget http://www.sqweek.com/sqweek/files/vnstat_php_frontend-1.5.1.tar.gz
tar xzvf vnstat_php_frontend-1.5.1.tar.gz
cd vnstat_php_frontend-1.5.1
mkdir /var/www/html/vnstat
cp -r . /var/www/html/vnstat
cd /var/www/html/vnstat
masukan perintah berikut :
nano config.phpEdit config.php,
ganti Network interface ke venet0
kemudian edit juga bagian ini
$language = 'en';Perhatikan Gambar
$iface_list = array('venet0', 'sixxs');
$iface_title['venet0'] = 'Internal';
$data_dir = '/var/lib/vnstat/';
reboot vps anda
rebootkemudian cek di
http://ip_server/vnstat
INSTALASI SQUID MENGGUNAKAN PASSWORD PADA CENTOS dan DEBIAN - UBUNTU

CENTOS
# yum -y install squid
# yum -y install nano
DEBIAN/UBUNTU
# apt-get install squid3
# apt-get install nano
sekarang Kita Jalankan Squidnya
CENTOS
# service squid start
DEBIAN
# sudo /etc/init.d/squid3 start
========================
Sekarang Sudah Terinstall SQUID di VPS kawan-kawan, tinggal
konfigurasinya kita rubah sedikit.
CENTOS
# nano /etc/squid/squid.conf
tambahkan line berikut (sebaiknya jangan merubah configurasi lain, kecuali ingin
merubah port dari default 3128 jadi port 8080 atau brapapun
---------------------------------------------------------------------------
auth_param basic program /usr/lib/squid/ncsa_auth /etc/squid/passwd
auth_param basic children 5
auth_param basic realm Maaf...ini proxy premium, hubungi groundman!!!
auth_param basic credentialsttl 2 hours
auth_param basic casesensitive off
---------------------------------------------------------------------------
Perhatian:
baris pertama :
>> auth_param basic program /usr/lib/squid/ncsa_auth /etc/squid/passwd
digunakan untuk 32bit VPS untuk 64bit rubah menjadi :
>> auth_param basic program /usr/lib64/squid/ncsa_auth /etc/squid/passwd
===========================
kini kita save CTRL+X >> y >> CTRL+T arahkan ke squid.conf >ENTER !
langkah selanjutnya touch tempat password yang telah kita buat yaitu passwd
# cd /etc/squid
# touch passwd
# chmod o+r passwd
# htpasswd passwd joko [joko hanya contoh user saja]
kemudian akan muncul password yang akan anda gunakan untuk user "joko" diatas
restart squid
# service squid restart
==============Done !!
Untuk Selanjutnya Menambahkan user cukup dari WEBMIN,
SERVER -- SQUID PROXY SERVER-- PROXY AUTHENTICATION
Membuat User Melalui WEBMIN
1. Masuk Ke webmin anda dengan akses/user root
2 .Pilih System >> Users and Groups
Kemudian Ikuti Gambar dibawah :
Pilih Create New User

3. Isi Kolom yang Ditandai dibawah :

DONE !!
Note :
-------
jika memasukan user dropbear gunakan SHELL
/sbin/nologin
Untuk Lebih Jelas nya silahkan lihat tutor gif berikut

readmore...
2 .Pilih System >> Users and Groups
Kemudian Ikuti Gambar dibawah :
Pilih Create New User
3. Isi Kolom yang Ditandai dibawah :
DONE !!
Note :
-------
jika memasukan user dropbear gunakan SHELL
/sbin/nologin
Untuk Lebih Jelas nya silahkan lihat tutor gif berikut

Cara Merubah IP VPS Menjadi Domain TK
1. Daftar dulu di my.dot.tk
2. kemudian daftar di cloudflare, masukan domain yang kita buat di my.dot.tk


 3. Setelah sampe ke 3 gambar itu, delete semua DNS record jangan sampe tersisa.
4. Setelah itu, sekarang buat DNS record baru dengan IP VPS kita. Dan pastikan sesuai gambar di bawah ini (ganti ip nya dengan ip kalian).

 5. Buka dot tk terus pilih domain kita, abis itu copy DNS kita ke domain kita, pilih di dot.tk Custom DNS.
 6. Tunggu bentar sampe ada tanda ijo dan domain siap di gunakan sebai IP VPS.


readmore...
2. kemudian daftar di cloudflare, masukan domain yang kita buat di my.dot.tk


4. Setelah itu, sekarang buat DNS record baru dengan IP VPS kita. Dan pastikan sesuai gambar di bawah ini (ganti ip nya dengan ip kalian).


Cara Merubah IP VPS Menjadi Domain CO.VU
1. Daftar dulu di codotvu.com
2. Isi form dan ikuti petunjuk berikut


3. Setelah seperti gambat di atas, sekrang pilih DNS Record, bagian host di kosongkan dan content di isi dengan IP VPS.

4. Selesai

Install HPN SSH di VPS Centos (meningkatkan Speed Tunneling SSH)

1. Install aplikasi yang kita butuhkan untuk mencompile dan patch SSH agar menjadi HPN SSH
yum install zlib zlib-devel pam pam-devel openssl openssl-devel gcc patch2. Sekarang kita pindah ke direktori /usr/src terus download bahan yang mau diinstall
cd /usr/src3. Selanjutnya kita extract SSH mentahan kita, terus masuk ke direktorynya
wget http://download.openpkg.org/components/cache/openssh/openssh-5.9p1.tar.gz
wget http://download.openpkg.org/components/cache/openssh/openssh-5.9p1-hpn13v12.diff.gz
tar -xzvf openssh-5.9p1.tar.gz4. Setelah itu kita apply patch HPN SSH nya
cd openssh-5.9p1
zcat /usr/src/openssh-5.9p1-hpn13v12.diff.gz | patchProses patching sedang berjalan, nggak lama kok.
5. Kalau udah, kita configure SSH yang telah di patch tadi
./configure –prefix=/usr –sysconfdir=/etc/ssh –with-pamJangan cuman pake ./configure , soalnya ujungnya failed biasanya rolling on the floor
6. Jangan langsung di make dan make install. Kita hapus dulu config SSH sebelumnya biar tidak konflik
rm /etc/ssh/ssh_config7. Nah, sekarang baru kita make terus make install.
rm /etc/ssh/sshd_config
makeNanti bakalan ada beberapa file exist, biarin aja soalnya beberapa file seharusnya tidak di replace
make install
8. Langkah terakhir kita restart SSH nya
service sshd restartSekarang coba logout terus login lagi. Versi SSH nya bakalan berubah jadi SSH-2.0-OpenSSH_5.9p1-hpn13v12
Subscribe to:
Posts (Atom)